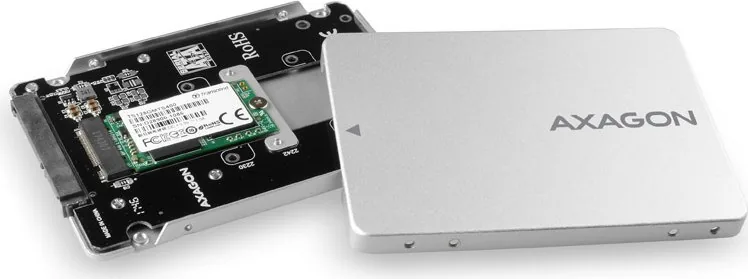
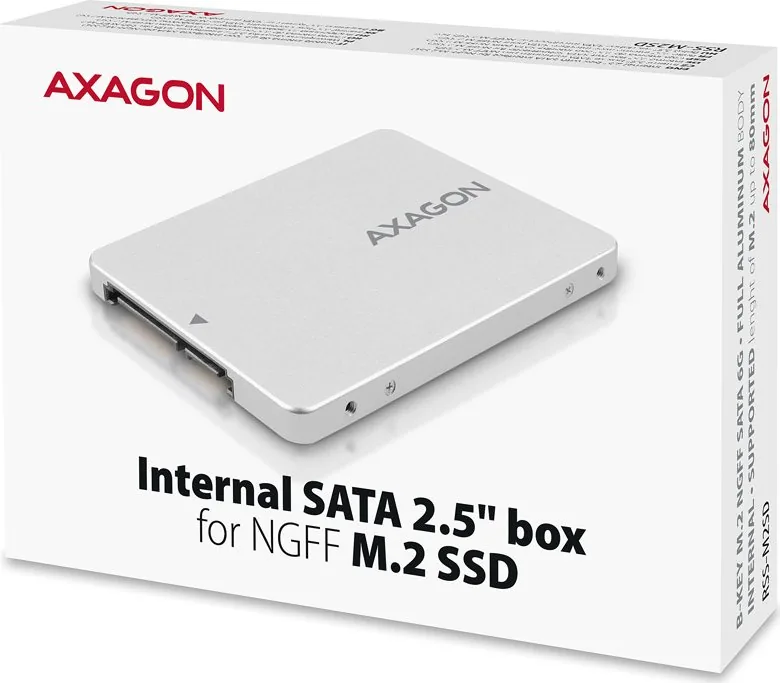
SATA (AHCI) M.2 SSD single or double sided disks, no disk capacity limitation
M.2 disk dimension support: 2230, 2242, 2260, 2280 mm
B-KEY AND B+M-KEY M.2 SSD disks supported
NGFF 75-pin B-key slot for SATA M.2 disks
SIZE NET WEIGHT
70 x 100 x 7 mm & 48 g
POWER SUPPLY
Powered via SATA Power Connector
OTHER FEATURES
Automatic installation
No driver needed
S.M.A.R.T. info
BOOT • UASP • TRIM
Plug & Play • Hot Plug
OS SUPPORTED
WINDOWS 7 • 8 • 10 & later
OS X 10.x & later
Linux 2.6.x & later
ENG Internal 2.5" box with SATA interface for SATA M.2 SSD
CZ Interní 2.5" box se SATA rozhraním pro SATA M.2 SSD
DE Interne 2.5" Box mit SATA Schnittstelle für SATA M.2 SSD
DK Intern 2.5" boks med SATA-interface til SATA M.2 SSD
ESP Caja interna de 2.5" con interfaz SATA para SATA M.2 SSD
FIN Sisäinen 2.5" -laatikko SATA-liitännällä SATA M.2 SSD -levyille
FR Boîte 2.5" interne avec interface SATA pour SATA M.2 SSD
GR Εσωτερικό κουτί 2.5" με διεπιφάνεια SATA για SATA M.2 SSD
HR Unutarnja 2.5" kutija s SATA sučeljem za SATA M.2 SSD
HU Belső 2.5" -es doboz SATA interfésszel az SATA M.2 SSD-hez
IT Scatola interna da 2.5" con interfaccia SATA per SATA M.2 SSD
NL Interne 2.5"-doos met SATA-interface voor SATA M.2 SSD
PL Wewnętrzna skrzynka 2.5" z interfejsem SATA dla SSD SATA M.2
PT Caixa interna de 2.5" com interface SATA para SATA M.2 SSD
RO Casetă internă de 2.5" cu interfață SATA pentru SATA M.2 SSD
RU Внутренний 2.5" корпус с интерфейсом SATA для SATA M.2 SSD
SK Vnútorný 2.5" box s rozhraním SATA pre SATA M.2 SSD
SWE Intern 2.5" box med SATA gränssnitt för SATA M.2 SSD
TR SATA M.2 SSD için SATA ara yüzlü dâhili 2.5" kutu
BG Вътрешна 2.5" кутия със SATA интерфейс за SATA M.2 SSD
CN
内置
2.5
英寸机箱,带
SATA
接口,适用于
SATA M.2 SSD
ARA
SATA M.2 SSD
SATA
2.5
Mount SSD
to the box.
(see Figures 1- 4
on the next page)
Namontujte disk
do boxu.
(viz. obrázky 1- 4
na další straně)
инсталирайте диска
в кутията.
(виж изображения 1- 4
на следващата страница)
Namontujte disk
do boxu.
(viď. obrázky 1- 4
na ďalšej strane)
установить диск
в бокс.
(см. рисунки 1- 4
на следующей странице)
Montaţi
discul încasetă.
(a se vedea fig. 1- 4 de
pe pagina următoare)
Proszę zamontować
dysk w obudowie.
(patrz ilustracje 1- 4
na następnej stronie)
Montate il disco
nel box.
(vedi disegni 1- 4
sull'altro lato)
Szerelje
a meghajtást
a dobozba.
(lásd az 1- 4 ábrákat
a következő oldalon)
Montez le disque
dans la boîte.
(voir images 1 a 4
de la page suivante)
Monte el disco en
la caja.
(ver figuras 1- 4
en la página siguiente)
Montieren Sie
die Festplatte in
die Box.
(siehe Abbildungen 1- 4 auf
der weiteren Seite)
Monter SSD til boksen.
(fig. 1 - 4 på næste side)
Kiinnitä SSD
laatikkoon.
(kuvat 1 - 4
seuraavalla sivulla)
Τοποθέτηση SDD
στο κουτί.
(εικόνες 1 - 4 στην
επόμενη σελίδα)
Postavite SSD
na kutiju.
(slika. 1 - 4 na
sljedećoj stranici)
Monteer SDD
aan de doos.
(afb. 1 - 4 op
volgende pagina)
Monte o SDD
na caixa.
(fig. 1 - 4
na próxima página)
SDD'yi kutuya takın.
(şek. sonraki
sayfada 1 - 4)
Montera SSD
på boxen.
(bild 1 - 4
på nästa sida)
Turn off
your computer
and unplug
the power cord.
Vypněte počítač
a odpojte napájecí
kabel.
Изключете компютъра
и разединете
захранващия кабел.
Vypnite počítač
a odpojte napájací
kábel.
Выключить компьютер
и отсоединить шнур
питания.
Opriți calculatorul
și deconectați cablul
de alimentare.
Wyłącz komputer
i odłącz przewód
zasilający.
Spegnere
il computer
e scollegare il cavo
di alimentazione.
Kapcsolja ki
a számítógépet
és húzza ki
a tápkábelt.
Éteindre l’ordinateur
et débrancher
le câble
d’alimentation.
Apague el ordenador,
desconecte el cable
de alimentación.
Den Computer
ausschalten
und das Netzkabel
trennen.
Sluk for din computer
og tag stikket ud af
stikkontakten.
Sulje tietokone ja
irrota virtajohto.
Σβήστε τον υπολογιστή
σας και αφαιρέστε από
την πρίζα το καλώδιο
τροφοδοσίας.
Isključite računalo
i odspojite kabel
za napajanje.
Schakel uw computer
uit en koppel de
voedingskabel los.
Desligue
o computador
e desconecte
o cabo da fonte
de alimentação.
Bilgisayarınızı
kapatın ve güç
kaynağı kablosunu
çıkarın.
Stäng av datorn och
dra ut strömkabeln.
Open the cabinet
and insert the box
into a free
2.5" position.
Otevřete skříň
a do volné
2.5" pozice
zasuňte adaptér.
Отворете кутията
и поставете адаптера
в свободна 2.5"
позиция.
Otvorte skriňu
a do voľnej
2.5" pozície
zasuňte adaptér.
Открыть коробку
и в свободную
позицию 2.5"
вставить адаптер.
Deschideți carcasa și,
în poziția liberă 2.5",
introduceți adaptorul.
Otworzyć pudło
i na wolnej
pozycji 2.5"
wprowadzić adapter.
Aprire il case
e inserire
l'adattatore
nello slot
libero 2.5".
Nyissa ki a házat
és helyezze
be az adaptert
egy szabad
2.5" helyre.
Ouvrir la boîte
et insérer
l’adaptateur dans
une position 2.5"
libre.
Abra la caja
e introduzca
el adaptador en
una posición
2.5" desocupada.
Das Gehäuse
aufmachen
und den Adapter
in eine freie
2.5"-Position
einstecken.
Åbn kabinettet og
indsæt boksen i en fri
2.5" position.
Avaa kotelo ja aseta
laatikko vapaaseen
2.5"-asentoon.
Ανοίξτε το ντουλαπάκι
και εισάγετε την κουτί
σε μια ελεύθερη
θέση 2.5".
Otvorite kućište
i umetnite kutiju
u slobodan
2.5" utor.
Open de behuizing
en plaats de doos in
een vrije 2.5"-positie.
Abra a
o compartimento
e insira o caixa
numa ranhura
livre 2.5".
Kasayı açın kutuya
boş bir 2.5"
konumuna yerleştirin.
Öppna facket och
sätt boxen i en ledig
2.5"-plats.
Plug the box to
the SATA port of
the computer.
Připojte box
k SATA portu PC.
свържете кутията
към SATA порта
на компютъра.
Pripojte box
k SATA portu PC.
подключить бокс
к SATA-порту ПК.
Conectaţi caseta
la portul SATA
al PC-ului.
Proszę podłączyć
urządzenie
do portu SATA
komputera.
Collegate il box
alla porta SATA
del PC.
Csatlakoztassa
a dobozt a
számítógép SATA
bemenetéhez.
Connectez la boîte
au port SATA du PC.
Conecte la caja al
puerto SATA del PC.
Schließen Sie
die Box an
den SATA-Anschluss
des Rechners an.
Slut kassen til SATA
porten på computeren.
Liitä laatikko
tietokoneen
SATA-väylään.
Συνδέστε το κουτί
στην θύρα SATA
του υπολογιστή.
Priključite kutiju na
SATA priključak
računala.
Sluit de doos aan op
de SATA-poort van
de computer.
Conecte a caixa
à porta SATA
do computador.
Kutuyu bilgisayarın
SATA portuna takın.
Anslut boxen till
datorns SATA-port.
Close the cabinet,
connect the power
and turn on
the computer.
Uzavřete skříň,
připojte napájení
a zapněte počítač.
Затворете кутията,
включете захранването
и включете компютъра.
Uzavrite skriňu,
pripojte napájanie
a zapnite počítač.
Закрыть крышку,
присоединить питание
и включить компьютер.
Închideți carcasa,
conectați
alimentarea
și porniți
calculatorul.
Zamknąć pudło,
przyłączyć zasilanie
i włączyć komputer.
Chiudere il case,
collegare
l'alimentazione
e accendere
il computer.
Zárja be a házat,
csatlakoztassa
a tápforrást és
kapcsolja
be a számítógépet.
Fermer la boîte,
brancher
l’alimentation
et allumer
l’ordinateur.
Cierre la caja,
conecte
la alimentación,
encienda
el ordenador.
Das Gehäuse
zumachen,
ans Netz anschließen
und den Computer
einschalten.
Luk sagen, tilslut
strømmen og tænd
computeren.
Sulje kotelo, kytke
virtajohto ja
käynnistä tietokone.
Κλείστε την θήκη,
συνδέστε το στην
πρίζα και ανοίξτε
τον υπολογιστή.
Zatvorite kućište,
spojite napajanje
i uključite računalo.
Sluit de behuizing,
sluit de stroom aan
en zet de computer aan.
Feche
a compartimento,
conecte a energia
e ligue o computador.
Kasayı kapatın,
gücü bağlayın
ve bilgisayarı açın.
Stäng luckan,
anslut strömmen
och starta datorn.
In the Device manager,
please check
the successful
installation.
(see Figure A)
Zkontrolujte
úspěšnou
instalaci
ve Správci zařízení.
(viz. obrázek A)
проверете успешното
инсталиране
в "Device manager".
(вижтe изображение A)
Skontrolujte úspešnú
inštaláciu
v Správcovi zariadení.
(viď. obrázok A)
проверить успешность
установки в
«Диспетчере устройств».
(см. рисунок A)
Verificaţi
corectitudinea
instalării în Manager
dispozitive.
(a se vedea fig. A)
Proszę skontrolować
stan instalacji przez
funkcję Administrator
urządzeń.
(patrz ilustracja A)
Controllate l'esito
positivo
dell'installazione nella
Gestione periferiche.
(vedi disegno A)
Ellenőrizze a sikeres
telepítést
az Eszközkezelőben.
(lásd az A ábrát)
Vérifiez la bonne
installation dans
le Gestionnaire
de périphériques.
(voir image A)
Compruebe que
la instalación se
ha realizado con éxito
en el Administrador
de dispositivos.
(ver figura A)
Kontrollieren Sie
die erfolgreiche
Installation in
der
Geräteverwaltung.
(siehe Abbildung A)
I enhedsstyringen
skal du kontrollere
den succesfulde
installation.
(fig. A)
Tarkista laitteen
onnistunut
asentaminen
Laitehallinnasta.
(kuva A)
Στην Διαχείριση
Συσκευών, παρακαλώ
ελέγξτε ότι έγινε
σωστή εγκατάσταση.
(εικόνα A)
U Upravitelju uređaja,
molimo provjerite
uspješnost instalacije.
(slika A)
Controleer in
de apparaat beheerder
de succesvolle
installatie.
(fig. A)
No gestor
de Dispositivos,
verifique a instalação
bem-sucedida.
(fig. A)
Lütfen Aygıt
Yöneticisinden,
kurulumun başarılı
olup olmadığını
kontrol edin.
(şek. A)
Gå till
enhetshanteraren
för att se
installationen.
(bild A)
In the Disk manager,
please initialize
the new disk
and format it.
(see Figure B)
Nový disk inicializujte
a naformátujte
ve Správě disků.
(viz. obrázek B)
инициализирайте
новия диск
и го форматирайте
в "Disk management".
(вижтe изображение B)
Nový disk inicializujte
a naformátujte
v Správe diskov.
(viď. obrázok B)
новый диск
инициализировать
и отформатировать в
«Управлении дисками».
(см. рисунок B)
Discul nou se
iniţializează
şi se formatează
în Manager discuri.
(a se vedea fig. B)
Proszę inicjalizować
i sformatować nowy
dysk przez funkcję
Administrator dysków.
(patrz ilustracja B)
Inizializzate
e formattate
il nuovo disco nella
Gestione dei dischi.
(vedi disegno B)
Az új lemezt
inicializálja
és formátozza
a Lemezkezelésben.
(lásd az B ábrát)
Initialisez le nouveau
disque et formatez-le
dans le Gestionnaire
de disques.
(voir image B)
Inicialice el nuevo
disco y formatéelo
en el Administrador
de discos.
(ver figura B)
Initialisieren Sie
die neue Festplatte
und formatieren Sie sie
im Festplattenmanager.
(siehe Abbildung B)
I Disc Manager skal du
initialisere og den nye
disk og formatere den.
(fig. B)
Käynnistä
Levynhallinta
ja alusta uusi levy.
(kuva B)
Στην Διαχείριση Δίσκου,
παρακαλώ κάντε έναρξη
του νέου δίσκου και στην
συνέχεια κάντε του format.
(εικόνα B)
U Upravljanju
diskovima, molimo
inicijalizirajte novi
disk i formatirajte ga.
(slika B)
In de Disc Manager
initialiseert u de
nieuwe disc
en formatteert u deze.
(fig. B)
No gestor de Discos,
por favor inicialize
o novo disco
e formate-o.
(fig. B)
Lütfen Disk
Yöneticisinde,
yeni diski başlatın
ve biçimlendirin.
(şek. B)
Gå till diskhanteraren
och starta den
nya skivan och
formatera den.
(bild B)
Automatic installation
will take place
- no drivers
are required.
Proběhne
automatická
instalace
– nejsou potřeba
žádné ovladače.
Инсталацията
е автоматична
– не е необходимо
да инсталирате
никакви драйвери.
Prebehne
automatická
inštalácia
- nie sú potrebné
žiadne ovládače.
Произойдет
автоматическая
установка
– не нужно никаких
драйверов.
Are loc instalarea
automată
- nu sunt necesare
controlere
de niciun fel.
Dojdzie do instalacji
automatycznej
- nie są wymagane
żadne sterowniki.
L'installazione
procederà
automaticamente
– non è necessario
nessun driver.
A telepítés
automatikusan
megtörténik
– semmilyen
segédprogramot
nem igényel.
L’installation
est automatique
– aucuns drivers
ne sont nécessaires.
Entonces se efectuará
la instalación
automática
– ningunos
manejadores
hacen falta.
Es erfolgt eine
automatische
Installation
– es werden keine
Treiber benötigt.
Automatisk
installation vil køre
– drivers er ikke
påkrævede.
Automaattinen
asennus käynnistyy
- ajureita ei vaadita.
ΘΑ γίνει αυτόματη
εγκατάσταση
– δεν απαιτούνται
οδηγοί.
Pokrenut će se
automatska instalacija
– nisu potrebni
nikakvi upravljački
programi.
Automatische
installatie vindt plaats
-
geen stuurprogramma's
vereist.
A instalação
automática inicia
- não são necessários
drivers.
Otomatik kurulum
başlayacaktır
- herhangi bir
sürücü gerekmez.
Automatisk
installation
kommer att ske
- inga drivrutiner
krävs.
SSD disk is ready.
SSD disk
je připraven.
SSD дискът е готов.
SSD disk
je pripravený.
SSD диск готов.
Discul SSD este
pregătit.
Dysk SSD jest
przygotowany.
L'unità SSD è pronta.
Le disque SSD
est prêt.
El disco SSD
está listo.
Die SSD-Festplatte
ist bereit.
SSD-disken er klar.
SSD-levy on
käytettävissä.
Ο δίσκος SSD
είναι έτοιμος.
SSD disk je spreman.SSD schijf is klaar.
O disco SSD
está pronto.
SSD disk
kullanıma hazır.
SSD-disken
är klar.
Az SSD meghajtó
felhasználásra kész.
AB
B
B
AB
B
B
AA
A
A
INSERT THE SATA M.2 SSD DISK
AND FASTEN THE SCREWS
COMPLETE THE BOX
OPEN THE BOX
1.3.
2.
REMOVE THE SCREWS
4.
FIGURE A
Only devices which are added
to the Device Manager
when installing the case
and the hard drive are displayed.
printscreen ENG W10
CHECK CORRECT INSTALLATION IN DEVICE MANAGER
FIGURE B
INITIALIZE THE NEW DISK AND FORMAT IT IN DISK MANAGEMENT
printscreen ENG W10
.SSD -
.(
4 - 1)
.
-
.
2.5“ -
.
SATA -
.
-
.
- -
.
SSD -
(A
) . -
(B
) . -
/2
%
Quick check
I'm not a robot
Incorrect answer, please try again.
Chat with your AXAGON RSS-M2SD manual using AI
Get instant AI answers from your AXAGON RSS-M2SD manual
Ask anything about the AXAGON RSS-M2SD. Answers come from this manual, with the pages they are based on.
Ask a Question
0/1000
Do you recommend RSS-M2SD?
YesNo
Frequently Asked
Questions
A
No, the AXAGON RSS-M2 is specifically designed for SATA M.2 SSDs only. It will not work with NVMe drives as they use a different protocol and interface.
Is this answer helpful?
A
No, the device supports automatic installation. It is Plug and Play compatible with Windows, Mac, and Linux, so no manual driver installation is required.
Is this answer helpful?
A
It supports four common M.2 form factors: 2230, 2242, 2260, and 2280 millimeters. It works with both B-key and B+M-key connectors.
Is this answer helpful?
A
Yes, the AXAGON RSS-M2 supports hot plugging. You can connect and disconnect the drive while the computer is running, provided your OS and BIOS settings allow it.
Is this answer helpful?
A
After connecting the device and powering on your computer, check the Device Manager in Windows or Disk Management to see if the new drive appears correctly.
Is this answer helpful?
A
Yes, the adapter passes through S.M.A.R.T. data, allowing you to monitor the health and status of your SSD using standard diagnostic tools.
Is this answer helpful?
M: QW-35-FL
Advantagesand
Disadvantages
Advantages
Supports all major M.2 SATA SSD sizes including 2230, 2242, 2260, and 2280 mm
Plug and Play installation with no driver requirements needed
Enables hot swapping and supports UASP, TRIM, and S.M.A.R.T. features
Compact and lightweight design fits easily into tight 2.5-inch bays
Fully compatible with Windows, macOS, and Linux operating systems
VS
Disadvantages
Requires a free 2.5-inch drive bay inside the computer case
Does not support NVMe M.2 drives, only SATA protocol
No external casing provided, intended for internal use only
Power is drawn via SATA connector which may limit cable flexibility
Not suitable for use in wet or explosive industrial environments
Upgrade Your Storage with the AXAGON RSS-M2 2.5 SATA M.2 Box
The AXAGON RSS-M2 is a sleek internal solution designed to breathe new life into older computers or expand storage in modern builds. This compact device transforms standard SATA M.2 SSDs into a full-sized 2.5-inch drive, allowing for easy installation into any available drive bay. Whether you are looking to repurpose an old laptop SSD or add high-speed storage to a desktop without cluttering it with multiple cables, this box offers a seamless bridge between modern M.2 technology and legacy SATA interfaces.
Installation is remarkably straightforward and requires no technical expertise. Simply open your computer case, insert the adapter into a free 2.5-inch slot, and connect the SATA data and power cables directly from your motherboard and power supply. The unit supports both B-key and B+M-key M.2 SSDs, covering common dimensions like 2230, 2242, 2260, and 2280 mm. Once connected, the system automatically recognizes the drive without needing any additional drivers, thanks to Plug and Play functionality. You can then initialize and format the disk through your operating system's disk management tools immediately.
Performance is a key highlight of this adapter. It fully supports SATA III speeds up to 6 Gbit/s, ensuring that your SSD runs at maximum capacity. Features like UASP, TRIM support, and S.M.A.R.T. monitoring are included, providing robust data integrity and longevity tracking. The design is minimalist, measuring just 70 x 100 x 7 mm and weighing only 48 grams, making it nearly invisible once installed inside your chassis. It is compatible with a wide range of operating systems including Windows 7 and later, macOS 10.x, and Linux 2.6.x.
Important Notes
Ensure the computer is powered off before installing the unit.
Do not use in humid or explosive environments.
Recycle the product at an electronic waste facility when no longer needed.
Check Device Manager to confirm successful installation if issues arise.