


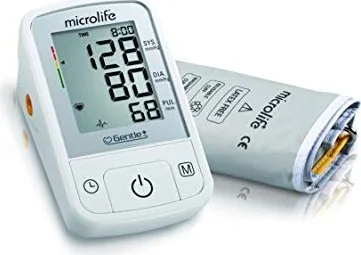
aponorm Basis Control Manual
PDF manual · 14 Pages
English



Quick check
Incorrect answer, please try again.
Chat with your aponorm Basis Control manual using AI
Get instant AI answers from your aponorm Basis Control manual
Ask anything about the aponorm Basis Control. Answers come from this manual, with the pages they are based on.
Ask a Question
Do you recommend Basis Control?
Yes NoFrequently Asked Questions
Press the M button to set the year, then press the time button to confirm and set the month. Repeat this process to set the day, hour, and minutes. Press the time button after setting minutes to finalize.
Is this answer helpful?
When batteries are flat, the symbol flashes upon switching on. You cannot take further measurements until new batteries are inserted. Follow replacement procedures carefully ensuring correct polarity.
Is this answer helpful?
Yes, you can use NiMH type reusable batteries. However, remove them if the device will not be used for a week to prevent total discharge damage. Charge them externally in an external charger.
Is this answer helpful?
Green means optimum blood pressure. Yellow signifies elevated levels. Orange indicates values are too high. Red warns that pressure is dangerously high according to international guidelines.
Is this answer helpful?
Recommendation is to test for accuracy every two years. You should also test it after any mechanical impact like dropping. Contact service to arrange these tests to ensure continued precision.
Is this answer helpful?
Yes, this monitor is specially tested for use in pregnancy and preeclampsia. Monitor blood pressure very closely during this time. If readings are too high, measure again after four hours.
Is this answer helpful?
If you see ERR 1, reposition the cuff as signal may be weak. For other codes like ERR 3, check for leaks or pump issues. Relax and retry measurement after five minutes if pulse is abnormal.
Is this answer helpful?
Advantages and Disadvantages
Advantages

- Reliable clinical testing ensures high accuracy for home monitoring of vital signs.
- Automatic memory stores last thirty readings for easy trend tracking and review.
- Traffic light display provides immediate visual feedback on blood pressure status categories.
- Pulse arrhythmia detection feature helps in early identification of irregular heartbeats.
- Rechargeable battery option available alongside standard AA battery use for flexibility.
Disadvantages

- Requires careful cuff placement positioning for accurate readings every single time.
- Memory capacity limited to thirty readings before oldest data automatically overwrites.
- Error codes may appear if measurements are taken during significant body movement.
- Cuff sizes are specific and may need separate purchase if fitting changes occur.
- Accuracy test recommended every two years to maintain measurement reliability standards.
Product Specification
Power Source
Battery powered (4x AAA batteries)
Measurement Type
Upper arm, Fully automatic
Cuff Size
8.66 - 16.54 inches
Analysis Data
Systolic, Diastolic, Pulse, Arrhythmia detection, Risk indicator
Memory Capacity
30 memory slots
Display
Yes
Features
Date display, Time display, Average display, Auto power-off
Package Contents
Carrying case, Blood pressure pass
Product Description
Introduction to Home Health Monitoring
Managing cardiovascular health is essential for long-term wellness. The aponorm Basis Control device offers a reliable way to track blood pressure at home. Using the aponorm Basis Control Manual provides the necessary steps for accurate use. This guide ensures users understand how to operate the equipment safely. Health professionals often recommend regular checks to maintain heart stability.
Setup and Preparation
Proper setup begins with power. Insert four AA batteries into the bottom compartment. Set the date and time using the specific buttons. Choosing the correct cuff size is critical. Measure your upper arm circumference to select the right fit. Options range from small to extra-large. A tight fit ensures precision. Avoid rolled-up sleeves that constrict the arm.
Taking Measurements
Relax for five minutes before starting. Sit comfortably with feet flat on the floor. Place the cuff about two centimeters above the elbow. Align the artery mark with the inner arm. Press the on button to begin. The device pumps automatically. Stay still and breathe normally. Do not talk or move during inflation. The pump stops when pressure is sufficient.
Reading and Memory
Results display systolic and diastolic values plus pulse rate. A traffic light indicator shows risk levels visually. Green indicates optimum health, while red warns of high pressure. The unit saves the last thirty readings automatically. You can review past data using the memory button. This helps track trends over time. Discuss significant changes with your physician.
Safety and Maintenance
Regular accuracy testing every two years is advised. Keep the device dry and away from extreme temperatures. Clean only with a soft dry cloth. Replace batteries when the symbol flashes low power. If using rechargeable types, remove them for storage. The device includes a pulse arrhythmia detector for early signs of irregular heartbeats. Always consult a doctor for unusual readings.
Error Handling and Support
Sometimes the device shows error codes like ERR 1 for weak signal. Reposition the cuff and try again. Other messages indicate low pulse or cuff issues. Follow the guidelines for these alerts. The manufacturer offers a three-year guarantee from purchase date. Keep the proof of purchase handy. Contact customer service for spare parts or advice. This support system adds confidence to your purchase.
Search for 67,706 Manuals online


Type-in Brand or Model